ControlAltDieliet 

- Home /
- Mattermost /
- Introduction to Integrations /
- Slash commands
Requesting data
with a slash command
In the previous article you learned how to request data with an outgoing webhook. In this article you learn how te set up a slash command.
Slash commands are the easiest way to send requests from private channels and direct messages to other programs
Slash commands are very common to outgoing webhooks but even a little more powerfull! In this article we'll show you how to request the temperature for a specific fridge.
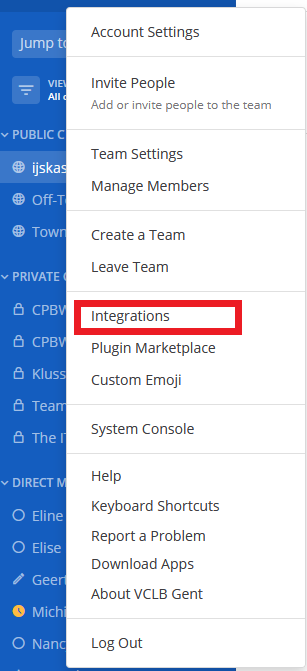
1 Create the Slash Command in four steps
1 Go to the Menu and choose Integrations
2 In the following screen, choose Slash Commands.
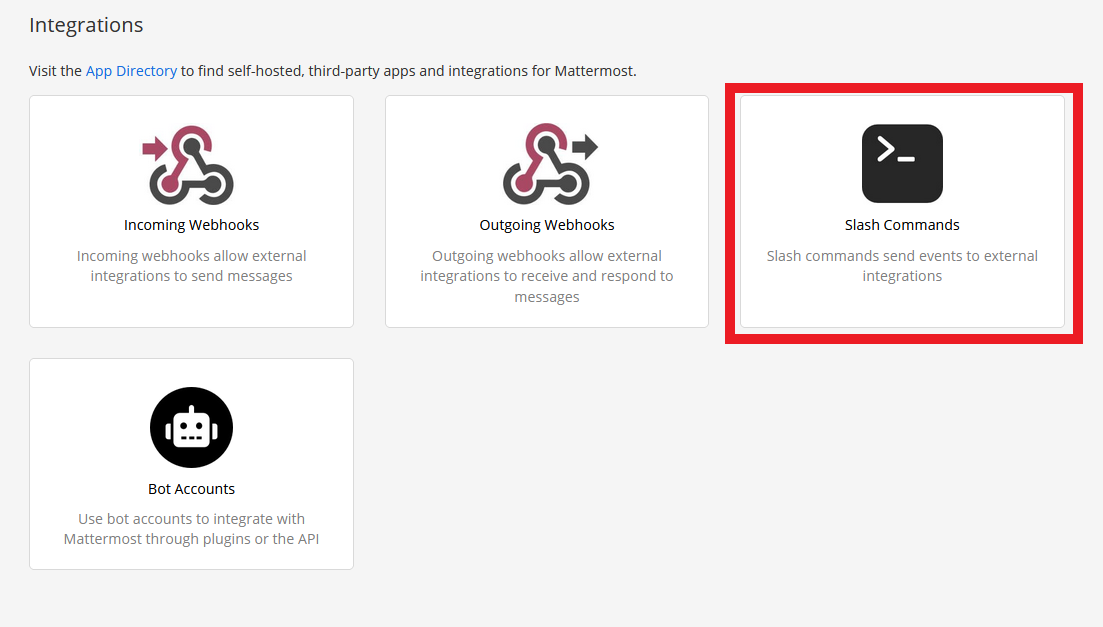
3 In the following screen, you see your existing Slash Commands and you can add a new one.

4 Now we setup the Slash Command in the next screen.
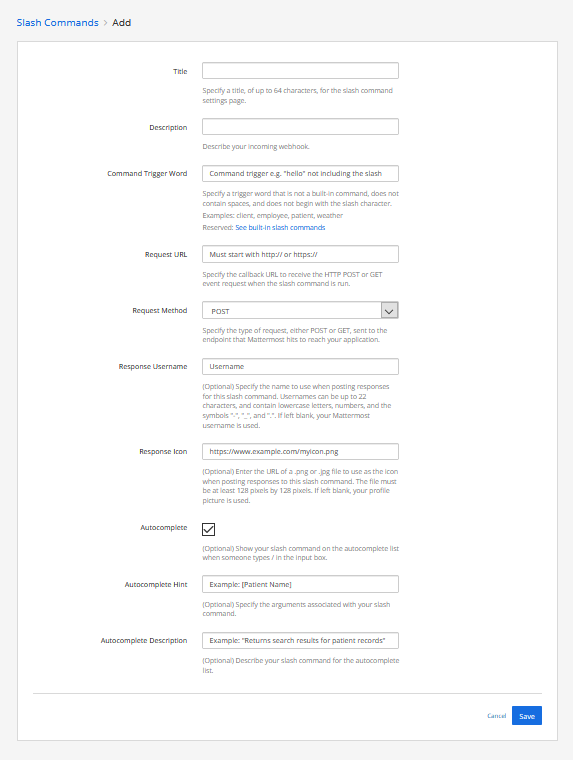
- Give the slash command a title
- Give the slash command a description
- Specify the trigger word to send the request (not including the slash)
- Give the URL's where the POST-request will be sent to Jump to this if you are planning to send to internal IP-addresses!
We will be using HTTPS and if you have a selfsigned certificate, you need to enable insecure connections. Here is how you do that. - Define if it will be a POST or a GET request.
- Give the username that will be displayed on the response
- Give the URL for the profile picture that will be displayed on the response
- If you check the Autocpmplete box, your slash command will be displayed in the list of commands when a use types /
You can give a hint with the command and it values and you can give a description that will be displayed as well when the users browses your command. - Click the save button
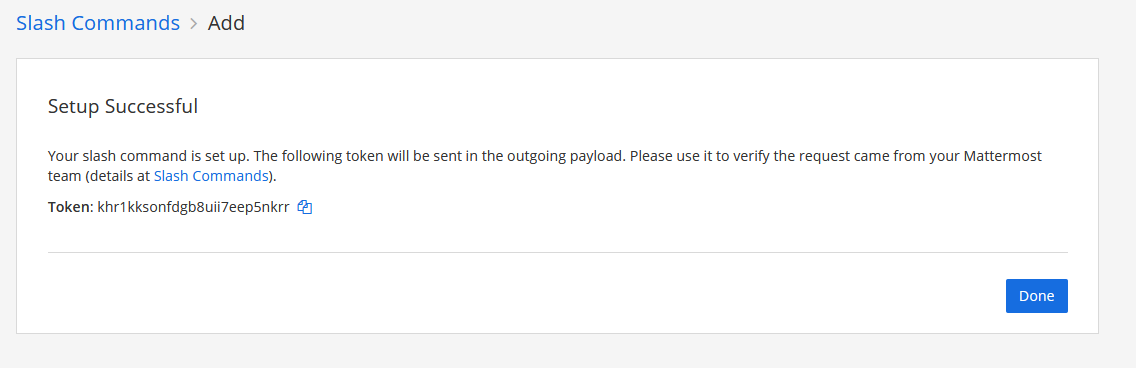
You 'll get the confirmation that the slash command is created. You get a very important token that we will be needing in our next step.
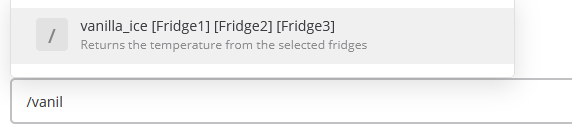
As we are using our slash command to retreive the temperature from our fridges (see part I), We named our slash command Ice Ice Baby, described it as the coolest command and it gets triggered with /vanilla_ice
2 Write some code
Ok, you made a slash command! Now we'll write some code that can listen to your requests.
First things first, we will send encrypted https requests. It's a good habit.
1 Let's make a selfsigned certificate!
openssl req -nodes -new -x509 -keyout server.key -out server.cert
cat server.key server.cert > server.pem
Now the magical Python code (beneath is a NodeJS example)
The slash-command sends the token you generated. Check if the token matches your generated token, else anyone can activate your slash-command.
The variables that the sender adds to the slash command are sent in a variable named text and are whitespace separeted.
!/usr/bin/python3
import time
import sys
import os
import ssl
import bottle
from bottle import Bottle, post, run, ServerAdapter,response,request
###CHANGE THE FOLLOWING LINES TO YOUR CONFIGURATION###
hostname = "The IP address of the device running your code"
serverport = 443
token="yourbrandnewtoken"
certfile="/path/to/your/just/created/server.pem"

@post("/freeze")
def hello():
    if request.forms.get('token')==token:
        variables=request.forms.get('text').split() #
        response.content_type = 'application/json'
        return '{"text":"your first variable is '+str(variables[0])+' your second variable is '+str(variables[1])+'"}'
    else:
        return HTTPResponse(status=403)


class SSLWSGIRefServer(ServerAdapter):
    def run(self, handler):
        from wsgiref.simple_server import make_server, WSGIRequestHandler
        import ssl
        if self.quiet:
            class QuietHandler(WSGIRequestHandler):
                def log_request(*args, **kw): pass
            self.options['handler_class'] = QuietHandler
        srv = make_server(self.host, self.port, handler, **self.options)
        srv.socket = ssl.wrap_socket (
         srv.socket,
         certfile='server.pem',  # path to certificate
         server_side=True)
        srv.serve_forever()

if __name__ == "__main__":
   '''UNCOMMENT IF YOU WANT TO RUN THE SCRIPT IN THE BACKGROUND###
   try:
   # Store the Fork PID
      pid = os.fork()

      if pid > 0:
        print ('PID: %d' % pid)
        os._exit(0)

   except :
     print ('Unable to fork. Error: ')
     os._exit(1)
     '''
srv = SSLWSGIRefServer(host="0.0.0.0", port=serverport)
run(server=srv)
Important note: your response has to be JSON-formatted
const https = require('https');
    const fs = require('fs');
    const qs = require('querystring');

    //MODIFY THE NEXT 4 LINES
    const token='yoursecrettoken';
    const serverport=4443;
    const key="/path/to/your/server.key";
    const cert="/path/to/your/server.cert";
    //

    var post;
    const options = {
      key: fs.readFileSync(key),
      cert: fs.readFileSync(cert)
    };

    https.createServer(options, (req, res) => {
      console.log(req.headers.authorization)

      if (req.headers.authorization == "Token "+token){
         if (req.method == 'POST') {
            var body = '';

            req.on('data', function (data) {
                body += data;

                // Too much POST data, kill the connection!
                // 1e6 === 1 * Math.pow(10, 6) === 1 * 1000000 ~~~ 1MB
                if (body.length > 1e6)
                    req.connection.destroy();
            });

            req.on('end', function () {
                post = qs.parse(body);
               console.log(post.text)

      variables=post.text.split(" ");
      res.writeHead(200, {'Content-Type': 'application/json'});
      res.write('{"text":"your first variable is '+variables[0]+' your second variable is '+variables[1]+'"}');
      res.end();
          });
        }
    }
  }).listen(serverport);
Important note: your response has to be JSON-formatted
3 More options
There are some options you can send with your response. Your response isn't limited to just text.
Changing the username
If you want to use another username appearing as sender, you can add the username variable. This setting is default disabled and must be enabled in the Managment Console!
{"text":"All is going very well, thank you for your kind interest.","username":"The Coolest Fridge"}
Changing the profile picture
If you want to change the profile picture, add the icon_url in the request.
'{"icon_url":"https://emojipedia-us.s3.dualstack.us-west-1.amazonaws.com/thumbs/120/apple/198/freezing-face_1f976.png","text": "The Fonz says the fridge is cool enough"}'
Adding emoticons
If you want to add an emoticon in the text, add the shortcode like :tada: in the text.
'{"text": "Wow, this works :tada:"}'
Adding more lay-out
If you are not familiar with Markdown layout you can find an introduction in the Mattermost Documentation
'{"text": "| Left-Aligned  | Center Aligned  | Right Aligned |
| :------------ |:---------------:| -----:|
| Left column 1 | this text       |  $100 |
| Left column 2 | is              |   $10 |
| Left column 3 | centered        |    $1 |"}'
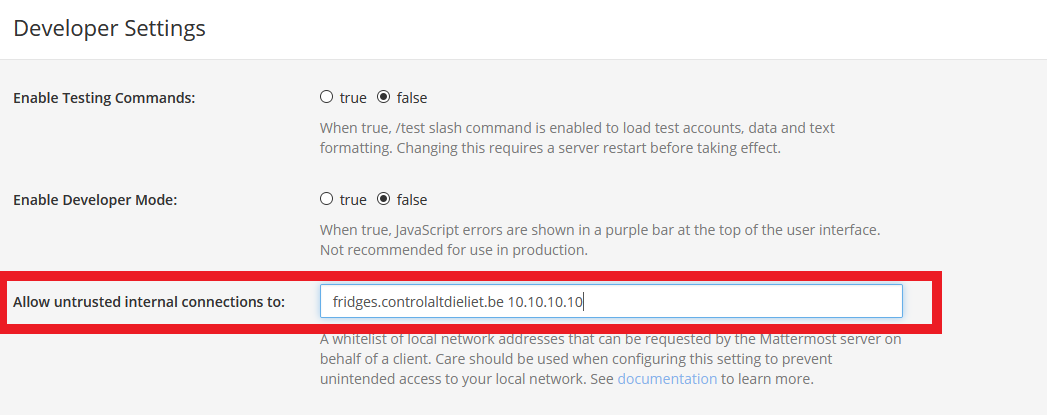
4 Allow untrusted internal connections
If you want to send your requests to your internal network, you have to specify to which hosts you want to send. Mattermost can only send to the specified internal hosts or hostnames! System Console -> Enviroment -> Developer
5 Unsecure outgoing connections
f-If you are using selsigned certificates like in our example you need to allow outgoing https connections with self-signed unverified certifcates. You find this setting in the System Console -> Enviroment -> Web Server

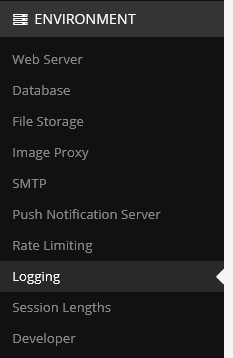
6 Debugging
Is something not working as expected? Go to the System Console and under Enviroment you find the Logging section.
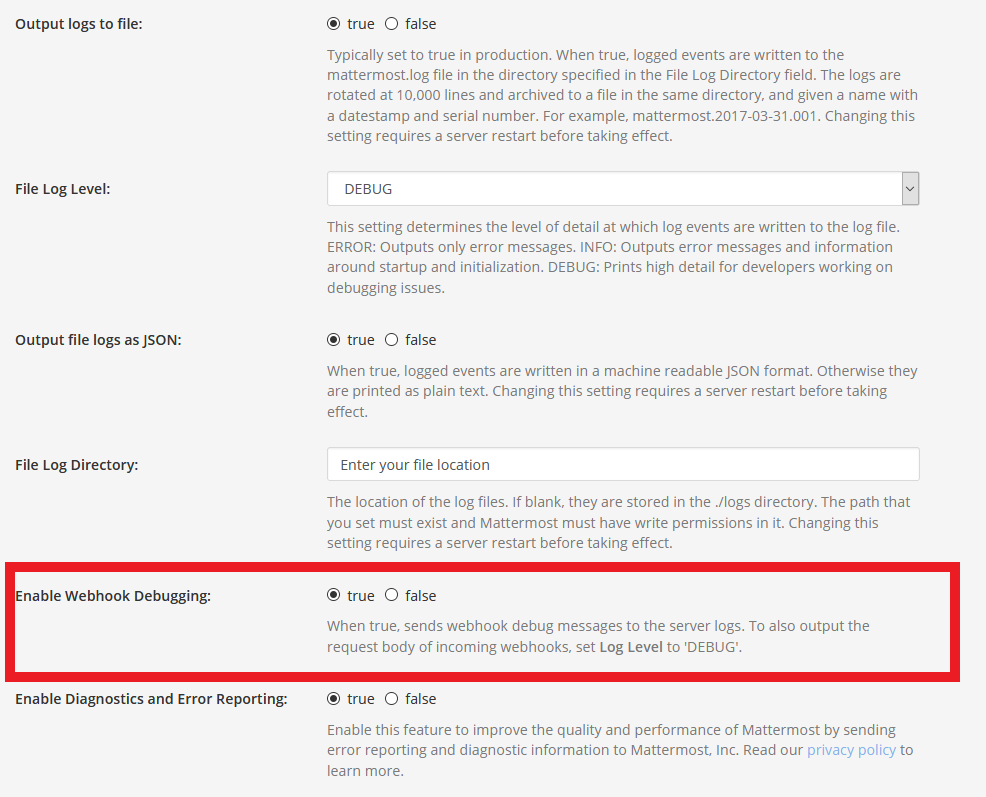
In the Logging section enable Webhook Debugging and set Log Level to Debug.
You'll find in the logfiles (or in the console if you enabled logging to the console) all the relevant information.
My most common mistake is a typo in the request. It gives me an "Unable to parse incoming data" error.
7 More info
Much more info in a comprehensive way you can find in the official Mattermost Developer Documentation on Slash Commands.
You can always ask for help at the Mattermost Forum