ControlAltDieliet 

- Home /
- Mattermost /
- Plugins /
- Global overview
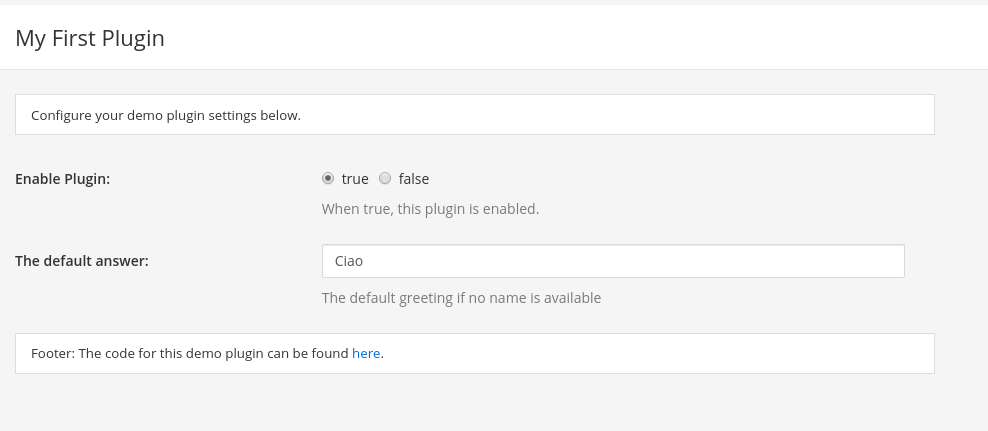
Plugins: overview
In the previous article we have set up your Developer enviroment. Your first start can be quite confusing. Where do you have to start? What do you have to do to get your first plugin up and running? In this series you'll find a path to write your own plugon.
In this article you get an overview on the structure of a Plugin. Plugins let you add more complex features to Mattermost. You can listen to events happening on your Mattermost and react on them. You can add extra items in the Main Menu, you can make interactive dialog boxes for your users. The possibilities are nearly endless.
Some important things that you have to know. Plugins have a Server part and a Webapp part. The Server-side is writen in Go and stores the configuration and interacts with the server or other external hooks. In the Webapp you can modify the view for the users. You can write a plugin that only needs a Server part, like the Welcome bot. Or you can write a plugin with only a Webapp part like you want to change the fontcolor for certain posts. But most plugins will have both parts.
You'll have to write the Server part in Go, the Webapp part in JavaScript.
Mattermost Plugins usually consists out of a Server and a Webapp part
You'll use the MatterMost Starter Template Plugin because it is minimalistic and is a good start.
The Mattermost demo plugin gives a very nice overview but can be overwhelming for a first start but is a good reference.
I also recomment to take a look at the Welcome bot or the Todo bot as starting point.
1 Cloning the Git repository
First you clone the starter template to your into your development enviroment.
 cd mmplugins
git clone --depth 1 https://github.com/mattermost/mattermost-plugin-starter-template com.example.my-first-plugin
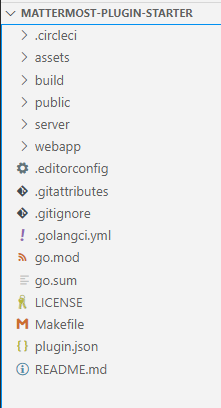
2 Folders and files you can ignore
The starter template is already skinned but there are still folders and files we don't need. Hurray :)
You can safely ignore the folder .circleci, build and the files .editorconfig, .gitattributes,.gitignore, .golangci.yml,go.mod,go.sum and Makefile
The LICENSE file is important so read it carefully ;)
Don't read the README.md, read this article instead.
3 plugin.json
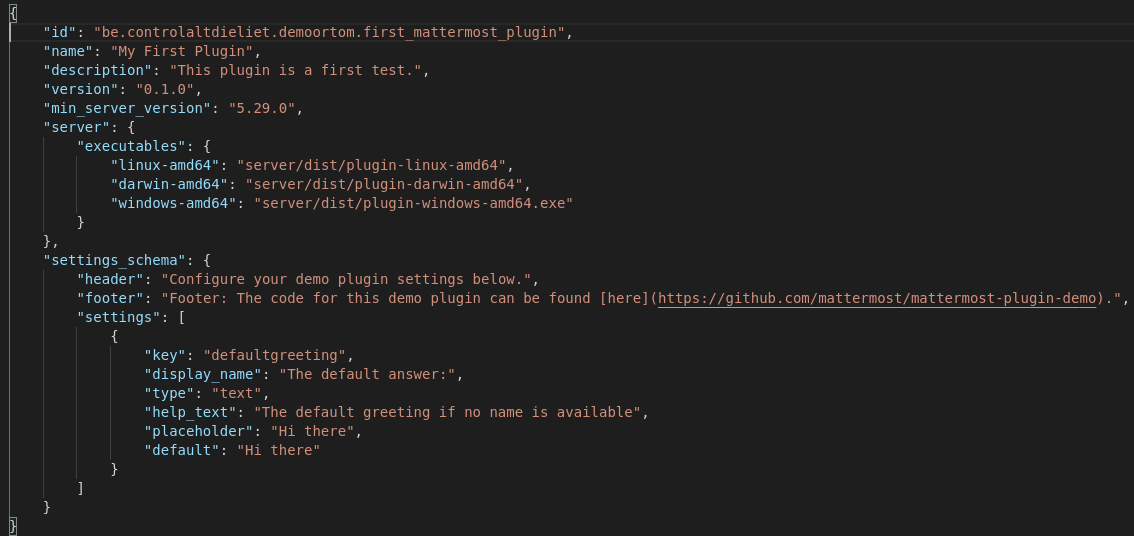
The plugin.json file is the most important configuration file for your plugin.
The id is an unique id for your plugin. It's a common rule to use your top level domain, your domain, your username and the name of the plugin. Something like:
com.github.controlaltdieliet.my-first-plugin. You will use this id when installing your plugin.
The next fields are needed but at this moment less important.
The next field is a name for your plugin.
In the next field you can give a Description.
You have a version value and a minimum server version.
In the server you find the folder and filename where the executables will be build.
In the webapp you find the same for the webapp component. If you are only building a server app you simply remove this webapp part and the webapp folder. If you are building as webapp only plugin, you remove the server part of the configuration and the server folder.
The settings you can ignore at this moment.
The next fields are from importance when you publish your plugin in the Mattermost Marketplace.
The homepage_url from your site, the support_url where people can file a support ticket, release_notes_url,icon_path.
The settings_schema creates the settings page in the System Console for your plugin. Administrators can set the variables there that your plugin can use.
4 The assets folder
Here you can place the binary files that your app needs. Like an icon or a nice pink fluffy unicorn avatar for your newly created bot.
5 The public folder
Here you can place the static html files that your webapp needs. Probably you'll ignore this.
6 The server folder
Together with the webapp folder the one folder that matters most ;).
Forget main.go and manifest.go. The configuration.go is where you will define and load all your configuration variables.
The plugin.go is the main engine of your server app. It's the core of your server app. In the following article we dive into this file.
If you want to build a webapp plugin only, you have to remove the server folder.
7 The webapp folder
The i18n stands for internationalisation and is used if you are writing a multilanguagal plugin.
All the other folders and files you can ignore, except for src ofcourse.
There you will find a index.js or index.tsx that is the heart of your webapp plugin. In a next article we dive into it that.
8 Deploying your plugin
Now it is time to deploy your plugin.
Go to to the folder mmplugins/mattermost-plugin-starter.
Give the make dist command. Your plugin will be build.
make dist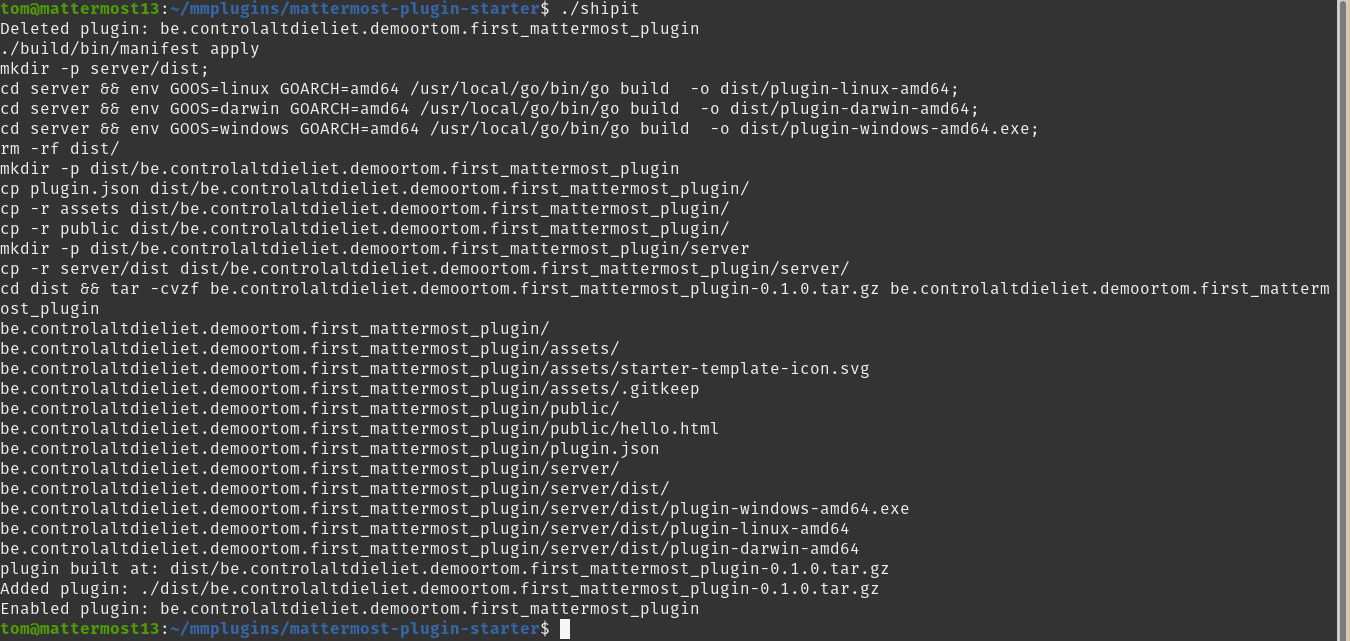 Now you have to add your plugin with:
 ../mattermost-server/bin/mmctl plugin add dist/com.mattermost.plugin-starter-template-0.1.0.tar.gz ../mattermost-server/bin/mmctl plugin enable com.mattermost.plugin-starter-template make dist
../mattermost-server/bin/mmctl plugin remove com.mattermost.plugin-starter-template
../mattermost-server/bin/mmctl plugin add dist/com.mattermost.plugin-starter-template-0.1.0.tar.gz
../mattermost-server/bin/mmctl plugin enable com.mattermost.plugin-starter-template 9 Success!